Sunday, April 28, 2013

Country Wedding

Last week I was able to make a wedding cake for my sister in law. 
 She wanted a country style cake that had a rustic, simple feel to it.  


 I also made cupcakes for the dessert buffet.  
After piping 350 cupcakes, my right hand was shaking.  
I have a new appreciation for bakers who pipe all day long. 

Vanilla, Pumpkin and Chocolate cupcakes on dessert buffet. 

Pumpkin cupcakes with a frilled cinnamon frosting.  

Chocolate cupcakes with handmade chocolate roses.  

Vanilla cupcakes topped with fondant daisies
It was so much fun to take on this project.  I am so glad the bride loved it. 


Friday, April 5, 2013

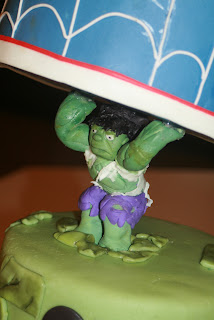
Hulk and Spiderman: Trial and Error

This cake was a learning cake.  I made this for my nephew.  He wanted Hulk and Spiderman to be incorporated into his cake.  I came up with this crazy idea...


Hulk is below and has one large skewer going through him, below and above him to connect the two cakes.  
I used a large straw filled with white chocolate to hold the bottom of Hulks skewer.  Once the chocolate hardened he should be  secure.  I made the top Spiderman cake using a Cake dummie so that it would be lighter and easier to deal with the weight of the cake. I didn't factor in the weight of my fondant made Spiderman.  


Hulk looks like he has a lot of muscles, but really they are just fake.  
He was not ready to support this cake.  I made him about a week before the cake, so he was completely hardened.  Then I hot glued his hands and head to the bottom of the Spiderman cake (which the cake was also skewered onto Hulk also). The weigh of the Spiderman figure was too much for one side of the cake though.  The cake lasted about 4 hours, after delivery I found out that it gave way to gravity and started tilting too much for comfort.  


The birthday boy got to see his cake, and enjoy it, but then to save the cake for the party later on the day, extra support had to be added to keep it together.  That really is just so sad, I wish I never made mistakes, but I do.  The idea seemed like a good idea in my mind, but realistically just didn't last.  Spiderman should have been made out of modeling chocolate which weighs lighter, and given the Hulk, two skewers, one in both feet, not just the one.  


Tuesday, March 12, 2013

How to carousel...

I apologize for not having very many photographs.  When I planned to make this cake I knew I wanted to write up a tutorial about it since it was hard to find one myself.  However as soon as I got my hands on the fondant, I forgot about my camera and went to work.  Here is what I do have.  

First thing I made was the top.  I used a 8" cardboard cake circle, on top of it I hot glued a cardboard semicircle, using a cereal box (so it was cardboard, yet bendable).  This created the canopy top.  
Then I created the six sides of the canopy, and "glued" them on to the edge of my 8" cake circle.  I had the canopy dry for two days on a smaller sized can, to allow the edges to dry hanging off the edge.  You can't see it in this photo, but I also hot glued a 1 1/2" circle (the diameter of your column opening) of Styrofoam to the center of my 8" cake board.  This Styrofoam will be used later to connect the column to the canopy


The base of the cake was actual cake.  I covered it like any other cake.


Then I pushed in my center column.  I molded fondant around a clean empty paper towel ring to create this column. It was made several days before, so that the bottom and top lips were allowed to harden.  The bottom  six or so inches were left empty since that was the area that would be inserted into the cake.  

The three gold rings on the cake were supports for my horses.  These too were made in advance so that they were hardened and would hold the horse dowels in place.  

Once the column was in place I put my horse dowels in my golden supports.  

 This was the tricky part. You place the canopy on top of the column, carefully inserting the Styrofoam circle (that you already placed on the center of the canopy bottom) into the columns center.   I got a glue gun and glued the columns top lip to the 8" cardboard cake circle. to secure it from tilting at all.  


And there you have it a carousel cake!  

(P. S. I got the shine by airbrushing it with a pearl finish)


Sunday, March 3, 2013

Carousel Cake

This month I was asked to make a cake for my niece who was turning 5 years old.  
She requested  a cake with horses and pink.  
Within a few minutes of thinking about it I really wanted to try to make a carousel cake. I had seen them before but didn't know how to make one, later I will post about how I went about making this cake.  

Here is Isabella's cake...


I like to add personal touches to the cakes, on the top of carousel I added gold 5's along the edge.  


The horses were fun to decorate with little saddles, and flowers along the body.  I steamed them to give them a little shine, to mimic the gloss found on wooden carousel horses. 


I added a name plate for Isabella with the year below.  This was made by using black food coloring as paint, and brushing on the name carefully.   

The top of the carousel was made about a week before, so that it was hardened enough to be stable.  
The top section and center pole are cardboard, covered in fondant.  


I was so excited to make this cake because it was unlike anything I had done before.
I hope she enjoyed the cake as much as I did making it.  


Happy Birthday!


Friday, February 1, 2013

Snowflake Cake

 My yard is covered in snow, snow that has been there since Christmas morning.  The temperature has been so cold that the snow hasn't melted...at all.  To help me from getting cabin fever, I decided to try to embrace the cold by making a fun snowy cake.  I wanted to practice piping, so that is what dominates this design.  


There aren't too many close up pictures of piping work online.  I tried to find some patterns since I have very little experience with this.  I kind of made up the pattern as I went, adding layers as I went.  


I added some sparkling dust on the edges, that helped the cake sparkle in the light.  


For the top I made a snowflake out of fondant.  
It was supported with a small toothpick in the back a little piping of "snow" drifts.  


I was suprised how warm a hand gets after it has been piping frosting for an hour and a half.  
Now that my snow cake is done, I am ready for winter to be done too.  Please hurry spring.


Monday, January 14, 2013

Family Event

I was able to make another cake this month, one for my mother in law.  She has many things she likes to do, read, cook, traveling, but her favorite thing by far is to be with her children.   She loves having them all together at dinners and reunions, and really they are her pride and joy.  When deciding on what "theme" to work with for her birthday it took all of a few minutes...her family!  


I started with making a little figure of herself.  
It always make people happy to see themselves in some edible format.  


"Love Always" is her theme.  She signs every card or email with it, and is always living by the theme by loving everyone truly unconditionally.  So I wanted to incorporate that with her family, since she often speaks of this life lesson to her children.  


She has 8 children, including spouses and grandchildren there is a total of 29 family members.  This cake wins the prize of most figures, and therefore, most hours it took to make.  There are a total of 30 people on this cake.  I make them in the stick man form, using those little car stickers you see as my inspiration.  


Those living in California have a beach in their background, while those in Utah have the mountains in the back.  The background was airbrushed.  Personalities of the figures were also added such as; army clothes for our solider, hiking for her husband the backpacker, a camera around the neck of her daughter the photographer, etc.  


She loved the cake, and everyone at the party enjoyed finding themselves on it.  
The cake was white almond, with a raspberry filling and vanilla frosting.  One of my favorite flavors!


Tuesday, January 8, 2013

Cakes aren't just for parties.

The reason for having a cake does not have to be for a party.  Last week my family and I woke up to no running water.  My husband went to work, with a promise that he would come back as soon as he could to figure out what the problem was.  Meanwhile, I was melting snow on the stove to provide water to wash our hands and wipe down my dirty two year old's face.  Then comes a knock on the door, it was a neighbor up the street who happens to be a plumber.  He had the day off and had heard that we were without water (probably from his sweet wife).  It had been an especially cold night and evidently our pipes froze.  My neighbor spent half the day (away from his family) figuring out the problem and fixing it for me. In return, he asked for nothing.  So after he left I wondered what I could do to thank him. It didn't take long before I thought of making him a cake!  Cakes can be great gestures of a "Thank you", "Get well", and "We appreciate you".  They are not just for parties.  


So a plumbers cake it was!  I wanted to make a nice classy cake, no "plumbers crack" humor here. 
 This man had sacrificed a relaxing day with his family, and I though he deserved something nice.
  So here is what I came up for him. 


My first thought was that I wanted to have "dripping" water on the cake, 
coming out of a copper pipe, like this.  


I really had so much fun making this copper pipe.  It was a creamy orange to start with, and then I added colored dust (mushroom, cocoa, and gold)  to give the look of a worn copper metal pipe.  


For the water, I started with a sky blue fondant, dusted them with with silver petal dust, 
and touched them with a hint of royal blue petal dust.  
The darker blue really helped give the drops their dimension.  


For the wording I wanted a rounded "pipe" look and when with a silver fondant. 
It too was dusted with silver petal dust to give it some shimmer.  


This cake wasn't on my agenda to make this week, but it all came together so well, and quickly.  
It was really fun to make and even more fun to give.